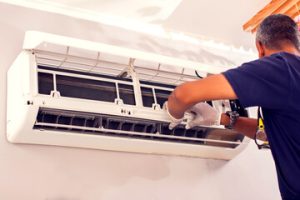
Water damage is a serious problem that can lead to structural issues and mold growth. Restoration professionals use specialized tools and techniques to assess the damage, remove standing water, and thoroughly dry the affected areas to prevent future problems.
The two most common services that restorers offer are mitigation and remediation. What is the difference between these two? Visit Salt Lake City Water Damage Restoration to learn more.
Remediation
Water damage remediation is the process of removing contaminants from affected areas. This includes cleaning and sanitizing as well as drying and dehumidifying materials and structures. It also involves identifying and fixing the cause of the water damage, which can help prevent future problems. The benefits of water damage remediation include preventing mold, bacteria, and other microorganisms from growing in the home or business, minimizing structural damage, and reducing health risks for people living or working there.
It is crucial to start water damage remediation as quickly as possible after the intrusion of water. The longer standing water is left untreated, the more contaminated it becomes. This is because materials like wood and metal rust and decay, creating an ideal environment for mold and other harmful organisms to grow. It can also lead to structural damage and weakening of the building. In addition, bacteria and viruses can spread in the water, posing health risks for those on the property.
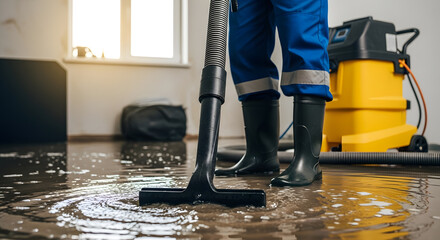
Mitigation is the first step in the restoration process. It focuses on controlling immediate threats, including water flow, and safeguarding personal belongings and building materials from further damage. This can involve boarding up or tarping vulnerable parts of the structure. It can also include water extraction, using high-powered pumps and vacuums to remove as much of the water as possible. This can be especially important when dealing with gray or black water, which has been contaminated by raw sewage or other dangerous chemicals.
The next step is to dry and dehumidify the area as quickly as possible, preventing further structural damage. It may also include removing and discarding any materials that can’t be salvaged, such as drywall or carpeting. This is particularly critical if the water is caused by a burst pipe or severe flooding. It can also be helpful in avoiding odors and making the affected area more comfortable for those living or working there.
Remediation can also involve treating any affected materials for bacteria and mold, which helps to eliminate odors and prevent future problems. It can also include repairing and replacing any materials that were irreparably damaged by the water or moisture.
Repair
Water damage repair is a comprehensive process that involves rebuilding and restoring a property to its pre-loss condition. It also addresses hidden moisture pockets, mold growth and other structural issues. It can take a lot of time and money, but professional water restoration experts know how to get the job done more efficiently. They can reduce the overall costs of the repair by identifying potential issues before they arise and preventing them from escalating.
While it may seem tempting to tackle minor water damage yourself, it is always best to leave any sort of cleaning or restoration work to the professionals. Professional technicians have access to the latest tools and technology that can save you time, money and hassle. They can quickly locate hidden moisture spots, dry out building materials and restore the impacted areas more effectively than any DIY method.
In addition to their expertise in repairing and restoring water damaged areas, these professionals can also provide valuable advice on the prevention of future problems, saving you both time and money. This could include fixing leaking pipes or redirecting runoff away from the building. This can help prevent costly future repairs and improve indoor air quality.
The remediation process takes place after the mitigation stage is complete. This is when technicians begin to assess the damage and determine if the affected materials can be restored or if they need to be replaced. The type of material involved is the main determining factor here, as different materials respond differently to water damage and may need to be replaced entirely.
Other factors to consider include the category and class of the water damage. Category 3 water damage, for example, is considered severe and must be dealt with by a professional as it contains bacteria and other harmful microorganisms. This can be caused by sewage backups, standing water, or toilet overflows.
Remediation also includes the disinfection and sanitization of the affected area to prevent health hazards. This can be achieved by applying a variety of cleaning agents and antimicrobial treatments. This is a critical part of the water damage restoration process, as it can significantly reduce the risk of further problems and ensure that the property is safe for re-occupancy. This is especially important for homeowners who are planning to sell their home in the near future as it can help streamline the process by removing any water damage issues before selling.
Cleaning
Cleaning involves sanitizing the affected areas and removing any visible dirt, residue, or buildup. Removing contaminants can help prevent mold growth and other health hazards. Cleaning also helps protect structural integrity, especially in buildings with wooden framing and drywall. Professional water damage remediation teams have specialized equipment like powerful pumps and wet vacuums to remove water quickly, which can greatly reduce the risk of structural problems.
Lingering moisture can lead to the degradation of building materials, resulting in warping, rotting, and compromised stability. Remediation professionals use moisture meters and thermal imaging to locate trapped moisture in wall cavities, underfloors, and other hard-to-reach places. These measures help preserve the longevity of building components, reduce the risk of future issues, and minimize damage to personal belongings.
Remediation also includes addressing the source of the water infiltration, whether it be a leaking pipe or roof leak. Addressing these issues promptly can save a significant amount of money in repair costs and minimize potential risks to occupants.
Restoration services can also help salvage and restore personal belongings that might otherwise be lost. Items such as furniture, electronics, and sentimental keepsakes can be saved through specialized drying and cleaning processes. This can ensure that a homeowner is able to get back their belongings and restore the value of their property. Restoring these items in a timely manner can also help reduce the stress and financial burden of filing an insurance claim. Water damage cleanup companies that specialize in restoring contents often have special relationships with insurance providers and can assist in the process from start to finish.
Rebuilding
If you have experienced significant damage to your property from water, you might need to completely rebuild the affected area. This involves tearing down damaged walls, flooring, and other structures before installing new materials and restoring electrical systems to work correctly. Rebuilding also includes removing and disposing of any contaminated debris. This can be a time-consuming process and can require the help of experts to get the job done properly. It is important to address the problem as soon as possible after it occurs so that you can minimize the risk of structural damage and prevent mold growth.
Water damage is not just costly and time-consuming to repair, but it can be hazardous to your health as well. Standing water can provide an ideal environment for the development of mold and other harmful microorganisms, which may cause respiratory problems. The moisture also poses a threat to the integrity of the building structure and can cause rotting, warping, and other structural issues. Timely water damage repair helps to remove excess moisture, eliminates health hazards, and restores the building structure to its original condition.
A professional water remediation company can help you restore your property from the effects of water damage, regardless of its severity. The best way to minimize water damage is through proactive maintenance and regular inspections, but when water damage does occur, it is crucial to act quickly to reduce the extent of the damage.
Mitigating water damage begins with a detailed assessment of the situation and the development of a comprehensive restoration plan. This will include strategies to remove moisture, including extracting standing water and drying the area using specialized equipment like dehumidifiers and air movers. This can be complemented by making temporary repairs to protect the property, such as applying tarps and boarding up windows.
Water damage is not just a risk for home and business owners, but it can also detract from the value of your property. Water damage can leave behind stains, discoloration, and wood rot that will make your property less appealing to prospective buyers. Fortunately, a good water remediation service can help you preserve your property’s value and streamline the sales process.
Visit our Professional Services Blogs
Portland Metro Plumbers, Provantage Handyman, Santa Ana Flooring, Plumbing Heating Cooling New Jersey, Riverside Stump Grinding, Painter In Hanover, My Restoration Directory, Miami Dade Restoration Services, Update Construction, Campanelli Construction, Cruz Construction And Restoration , Airconditioning Round Rock, Air Dynamics Airconditioning And Heating, Gands Airconditioning And Heating, Windward Building Company LLC, Airconditioning Repairs Bocaraton, Laguna Airconditioning, Roofing 719, 3 Phase Construction NJ, Broadway Building Contractors, UIS Concrete And Demo, Austin Plumbers Near Me, Richmond Gutter Cleaning Company, Weather Defense Roofing Weather Proof Roofing, Ray Allen Plumbing, Raleigh Pressure Washing Painting , Fairfield County Septic, Carlson Craft Cabinets, Helping Hand Home Improvement, Delco Home Inspector, Window Cleaning Stafford